Freitag, 29. Juni 2012

Gradient Nails with Catrice - Strawberry Fields Forever and Essie - Velvet Voyeur

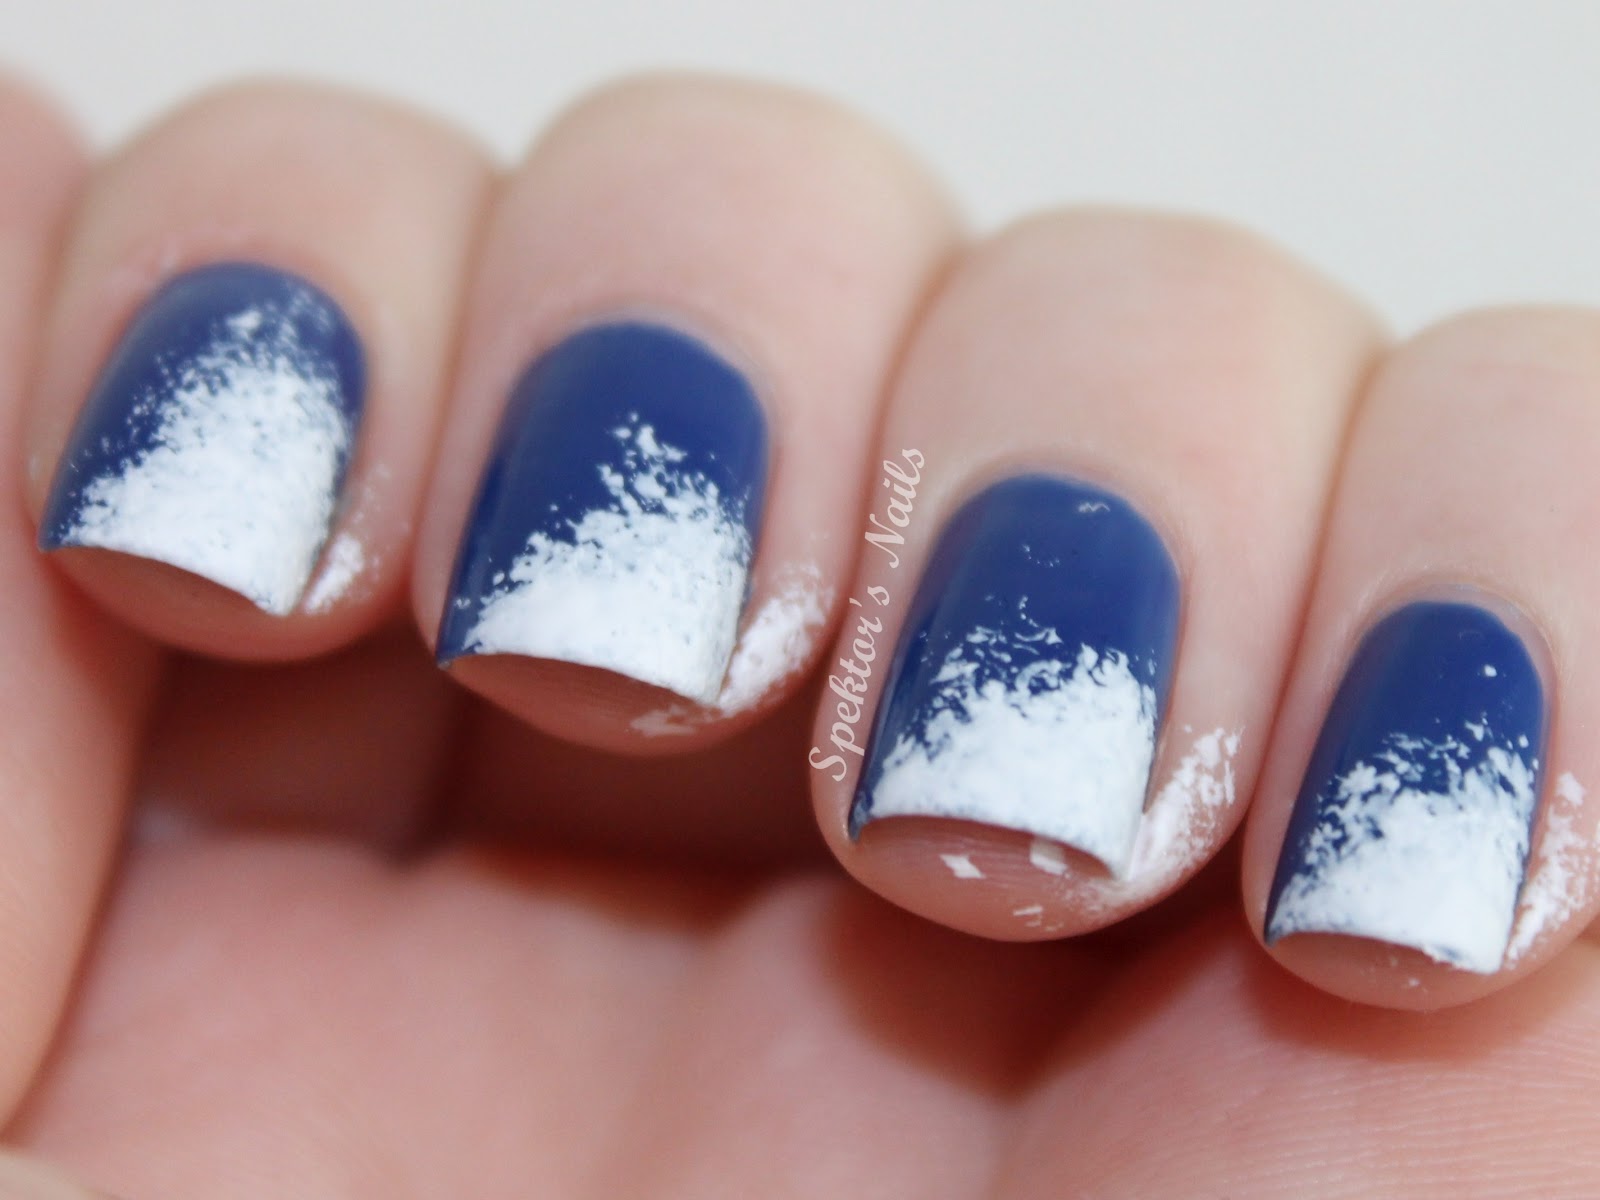
Today I'm gonna show you my pink gradient nails from last week. 


I used Catrice - Raspberry Fields Forever as a base coat and then Essie - Velvet Voyeur as my second color. For the gradient I used a sponge obviously and dripped a drop of each color on a piece of paper. Then I pressed the sponge into the nail polish and applied it onto the nails.

Gradient Nails are not my favorite ones. The process of creating them is sometimes really annoying for me, I don't really know why. It's messy, I don't achieve the expected results and it always takes me a lot of time. I even prefer water marbling!


Donnerstag, 28. Juni 2012

Stripes!

Some stripes for today!

I used four nail polishes and striping tape to create those stripes. 


Index: China Glaze - Lemon Fizz + Essie - Sew Psyched
Middle: CG - Lemon Fizz + Essie - In Stitches
Ring: Essie - In Stitches + Essie - Limited Addiction
Pinky: Essie - Sew Psyched + Essie Limited Addiction


I started with the lightest color as a base coat which didn't really work on my pinky nail. I don't think it would be much better the other way around though. And of course I smudged it with my top coat! 

Samstag, 23. Juni 2012

Carambar Nails

Do you know Carambar? The caramel candy? I love them and decided to do a design inspired by the original Carambar... I'm not too happy with my execution though, but they're funny anyway!


I used Artdeco - 545 over a white base coat, but nonetheless it took 3 coats to look somewhat opaque. And then the yellow didn't even look like the Carambar yellow... argh! 


For my accent nail I used a white base coat as well and added stripes with striping tape and Catrice - Raspberry Field Forever. I wasn't too sure about the smiley faces either, but I painted them anyway: with a nail art brush and a dotting tool, using brown nail polish and black and white acrylic paint. 


Yay, eat all the Carambar!!! 


Donnerstag, 21. Juni 2012

Ozotic - 529 & Sinful Colors - Pearl Harbor

Yay, malware warnings are gone! Sorry about that! I had to remove all my widgets and the blogroll. I think the problem was caused by a link in my blogroll, so I'm not gonna add a new one some time soon. The widgets will be coming back though, as soon as possible! Thank you for bearing with me and I hope you and your blogs are all fine! 


Well then, let's start again with something very pretty.


One coat each of Ozotic - 529 and Sinful Colors - Pearl Harbor over one coat of Wet 'n' Wild - Black Creme. I was pretty sure those two glitters would look amazing together. Well,  they do, but now that I compare my earlier pictures of 529 with today's result... there's not much of a difference actually. 


The one thing this combination changes is that there's light blue glitter involved as well. As always one coat of Seche Vite on top. 


And a weird bottle pic to give you an impression of what I was actually going for with this layering.  

Freitag, 15. Juni 2012

Glitter Sandwich: China Glaze - Something Sweet / Essence - Circus Confetti / Essence - Sweet As Candy

Glitter Sandwiches are really getting on top of my nail art hit list! Especially light blue and rose are my favorite ones.


For this one I used two coats of China Glaze - Something Sweet, one coat of Essence - Circus Confetti and one coat of Essence - Sweet As Candy on top.


Circus Confetti looks awesome in a sandwich! Take a look at my light blue glitter sandwich as well. 


On top one coat of Seche Vite as always. 


And just to make you a tiny bit curious... I'm planning a giveaway since I've hit 500 GFC Followers this week! Thank you so much for your support! 
Let's just say, there will be a rainbow involved... ;)

Donnerstag, 14. Juni 2012

Neon Straw Nails

For today a very simple but effective design... 
All you need is some nail polish and a straw!


I used NYX Matte White as a base color. Then I added a drop of black acrylic paint onto a paper and dipped the end of the straw inside the color. Then I transfered the color onto my nail with a rotating movement. Make sure there's not too much color inside the straw, because it's gonna mess up the fine line of your circles! Just press it onto paper first, before transfering it onto the nail. For my next round of circles I used China Glaze - Pool Party which works great with black and white! 

Wait long enough for the circles to dry completely before you apply your top coat. 

Mittwoch, 13. Juni 2012

Graffiti Nail Art by Algae Veronica

Since I've seen the Graffiti design by Algae Veronica I couldn't wait for her tutorial. Yesterday she uploaded it on YouTube and the first thing I did was recreate it on my nails. Check out the video here


I used Essence - Walk On Air as a base color (because it was already on my nails). Then I added white nail polish with a sponge. I think the key to the awesome Graffiti look is the imperfect piece of sponge you use! 


Onto my white splash I added the zig-zag bands with red and black acrylic paint and a nail art brush. 


One coat of Seche Vite on top. 


Make sure to check out the other designs from Algae Veronica as well, she's a great nail artist! 

Dienstag, 12. Juni 2012

Dipped In Gold (Essence - Iced Latte + Make It Golden)

Prepare for some sparkle! 

For this manicure I used three coats of Essence - Iced Latte and added golden glitter (from the craft shop)  with a fan brush while the third coat was still wet. 
(Bracelet by H&M)


Not enough sparkle for me! So I added some more: Essence - Make It Golden on the tips of my nails. 
(Ring by H&M)


Topped with one coat of Seche Vite. 
(Ring by SIX)


Love birds :) 


Montag, 11. Juni 2012

M&M's / Rainbow Nails

M&M's! Yay! 

I've seen those water decals last week at Chez Delaney's and I just had to order them. They're listed as 'HQ Water Decal K157'. 


I decided to put them on a rainbow of pastels, each decal on its pastel twin color. 

From left to right: 

Essence - Speed Of Light Blue 
China Glaze - Re-Fresh Mint
China Glaze - Something Sweet
China Glaze - Lemon Fizz 

I used one coat of Star Nail  - Nail Art Finishing Sealer on top. Application of the decals was flawless!

Sonntag, 10. Juni 2012

Black & White Water Marble

I haven't done a water marble design in a while, I guess just because I remember it as being a bit complex. Of course it takes a little more time to do a water marble design instead of just painting your nails. But if you prepare well you will be done much faster than with a lot of other nail art techniques! 

These are the things I prepare before starting my design:

        • A glass of distilled water
        • My nail polish selection 
        • 20 pre-cut sticky tapes (2 for each finger to protect the skin from polish)
        • Tweezers (to remove the tape without messing up my nails)
        • A sheet of paper (to stick on the tape after use)
        • A paper towel (to clean up my tools and get rid of waterdrops)
        • A needle (to marble of course)
        • Toothpicks (to remove the polish floating around my nails)


For today's design I have painted my nails the evening before with two coats of NYX Matte White. For the water marble I chose Catrice - Snow Motion (because I wasn't sure matte nail polish would work and because Snow Motion isn't too precious for me) and Wet 'n' Wild - Black Creme. I used one coat of Seche Vite on top.


Water marble is always a little bit tricky, since you don't really know how it's gonna look in the end. So I had my problems first with the black spreading too much and covering the white on my nails. You can see the grey on my pinky nail. I don't really have advice on how to avoid this. I guess water marbling is also a matter of luck sometimes!

Samstag, 9. Juni 2012

Glitter Sandwich: China Glaze - For Audrey / Essence - Glorious Aquarius

Today's design resulted once again from not knowing what to do with my nails. I painted them with two coats of China Glaze - For Audrey which is indeed a lovely color. But that wasn't enough so I added one coat of the shimmery top coat from Essence's double nail polish A Walk In The Park. It looked nice as well, but nice wasn't enough. So I added one coat of Essence - Glorious Aquarius. Which was definitely way too much glitter and shimmer. So what did I do? I added another coat and turned the whole thing into a glitter sandwich! ;-) Once again I chose p2 - Being In Heaven as the "jelly" top coat. 

So this is what I ended up with after six random coats of nail polish.


Despite its randomness I really like it, it's a very subtle blue toned glitter sandwich. And it's great if you love the "sandwich look" but don't want to go overboard with it (such as with Circus Confetti).


My boyfriend calls those glitter sandwiches "mould nails" since the glitter looks to him like my nails have gone mouldy underneath the nail polish... Yummy! 

Dienstag, 5. Juni 2012

Rainbow Flakies (Sinful Colors - Green Ocean + Kleancolor - Chunky Holo Black)

So, I bet you've seen those very special flakie top coats from Cult Nails (Unicorn Puke/Clairvoyant), Picture Polish (Festival), etc.? The ones with the  multicolored flakies? The ones which are almost always and everywhere sold out and quite expensive in addition? I wanted one of those really bad but I'm not gonna pay 20 $ for a bottle of nail polish. So since I own one of the prettiest green and blue flakie nail polish for some days now I decided to do my own rainbow flakie. 


You see two coats of Wet 'n' Wild - Black Creme, one coat of Sinful Colors - Green Ocean and one coat of Kleancolor - Chunky Holo Black. Plus one coat of Seche Vite as always.


So these two nail polishes are about 2 $ each and they're both easy and fast to apply. I'd definitely recommend combining the flakies you do already own! 


I used a matte top coat later and it looked gorgeous as well!

Sonntag, 3. Juni 2012

Mexican Pusheen Nails

My previous Fancy Pusheen nails have been quite popular so I decided to do another Pusheen design. If you don't know Pusheen, have a look at this website!


I chose the Mexican Pusheen for today's design and combined it with some Serape inspired nails. Serapes are those colorful Mexican blankets you might have seen before. For the Serapes I used a one stroke brush and acrylic paint and then added the colorful lines on a white base. 

For Pusheen I used acrylic paint as well and my smallest nail art brushes. 


When you're working with acrylic paint it's important to seal your design with top coat. Otherwise it's gonna peel off since acrylic paint is water soluble. I used two coats of Seche Vite to be safe.  

Samstag, 2. Juni 2012

Watermelon Nails

For the perfect start in a summery weekend I chose to do watermelon inspired nails. I love this color combination so much! 


I started off with two coats of H&M - Check Me Out on my regular nails and two coats of Catrice - Run Forest Run on my accent nail. For the flesh of the watermelon I chose to do a slight gradient with Essence -  Better Late Than Never. Those two colors work great together for gradient nails! 
On my accent nail I tried to recreate the green paring with dark green acrylic paint. I used a sponge to apply some color and then painted the lines with a nail art brush. 


Finally I added the seeds with black acrylic paint and a nail art brush. One coat of Seche Vite on top and my watermelon nails were done!