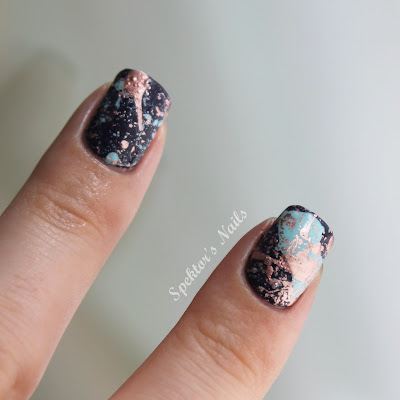
I love Splatter Nails! But the average technique to get Splatter Nails - blowing the paint with a straw directly onto the nails - is really annoying in regard to cleaning up the cuticles. That's why I always do Splatter Nails with the plastic bag method. I call it DIY Decals because you basically create decals and then stick it onto the nails. You can find my tutorial on how to do those at the end of today's post.
Today's color choice reminds me of Galaxy Nails. I used p2 - Night Out as my base color and then added Essie - Mint Candy Apple and Essie - Penny Talk with my straw. On top of everything is one coat of Revlon Quick Dry Topcoat.
What I love about the selfmade decals is the fact that you can chose the spot with the best pattern. When I did my first Splatter Nails without the plastic bag, I had some nails flooded in polish and others with no splatter at all.
So the process of creating your own decals is very easy but you will need some time to let it dry. You will need a plastic bag, a straw and your colors of choice. Then paint your base color onto the plastic bag. I always paint a rectangle about 10cm wide and a little bit more than two times my nail length. If you do this for the first time I'd recommend painting a bigger area so you have some spare decals to practice the technique. Take care not to paint the polish too thick because the thicker the decal the more difficult it will be to place it onto the nails evenly. Then you dip the straw in the bottle of nail polish and blow in the other end, so that the polish will splash onto the painted area. I always let my decals dry over night so they can be removed from the plastic easily. The next day you can cut the decal with your scissors and create small pieces in the size of your nails. Paint your first nail with one coat of the chosen base color, remove the decal from the plastic with tweezers and add it onto the wet polish. Press it down gently and wait for a little while. I can remove most of the overlapping parts with my other finger nails. After that I apply a first coat of clear nail polish to "melt" the decal and the base color together. Then I can clean it up like I would with my usual manicure and add a top coat.
And this is how you shouldn't be doing it. Hard to remove ;)
I had so much fun making this tutorial and I plan on doing more of them if you like it!


Aaaaalle Daumen hoch! Super Tutorial, tolle Farbmischung. Ich bin vonne Söckchen :D
AntwortenLöschenmuss ich unbedingt ausprobieren! Sieht - wie immer - toll aus :-)
AntwortenLöschenThanks for this! Awesome tutorial =)
AntwortenLöschenEin Wort: WOW!!!! *-*
AntwortenLöschenBrillaint idea! Will have to try this out. Thank you for sharing x
AntwortenLöschenIt's very nice!
AntwortenLöschenwww.denbelle.blogspot.be
that's a great idea!! I've tried this DIY technique to create triangles and such shapes but I wouldn't have thought of doing it for a whole nail! great great idea!!
AntwortenLöschenyour mani looks really amazing!!
Amazing tutorial, thanks so much for sharing! I would love to see more tutorials from you, this one was really well made.
AntwortenLöschenWunderschön! Wird nachgemacht, DANKE!
AntwortenLöschenThat is so genius! You make tutorials really well :)
AntwortenLöschenThis is just too awesome! I have to try this! :D
AntwortenLöschenI loved it!
AntwortenLöschenthank you so much for teaching this! I'll try it as soon as I can ;)
http://nailstyles.wordpress.com
I love this! Thanks for the tutorial, am gonna try it this weekend.
AntwortenLöschenThis is is best nail idea i've come across in a long time. I saw a tutorial with blowing straight unto the nails but i've got to say i'm loving your method 100% more. I will be trying it soon. Your chosen colours are awesome.
AntwortenLöschenThe Meme pic totally got me :D :D
AntwortenLöschenAwesome idea, which you realized pretty great - I'll try it out soon. :D
AntwortenLöschengonna try this tomorrow for sure!!
AntwortenLöschenI want to make these ahead of time... any idea how long they can be stored, and how?
AntwortenLöschenI can't say exactly, but I wouldn't wait too long because the longer you wait, the more they will dry out and they might break. But let me know if you try it, I'm curious! :)
LöschenAwesome idea ! :)
AntwortenLöschenThis is genious! I almost gave up on doing splatter nails because of the mess and uneven result. I have a challenge next week and I'm choosing Dexter as the theme so I'll try your idea to do a blood splatter.
AntwortenLöschenThank you!
Dieser Kommentar wurde vom Autor entfernt.
LöschenIt worked like charm! I did a spanish version of the tutorial linking yours back, hope that's ok
AntwortenLöschenhttp://cajondelosesmaltes.blogspot.com/2013/09/tutorial-decals-splatter-nails-salpicado.html
Brilliant tutorial! thanks for sharing. my only question is, what sort of plastic bag do you use? carrier bag? sandwich bag? tyia
AntwortenLöschenThank you very much! :) I used a freezer bag, but I think a sandwich bag would work just as well. It shouldn't be too thin, so that you won't damage the bag while pulling off the decal.
Löschen