I have something very simple and very Christmassy for today... I'm in the mood! I used two coats of the beautiful KIKO #391 Grass Green as my base for my one and only Christmas glitter top coat: China Glaze - Party Hearty. On top is one coat of Sally Hansen - Insta-Dri.
Posts mit dem Label China Glaze werden angezeigt. Alle Posts anzeigen
Donnerstag, 27. November 2014
Sonntag, 19. Oktober 2014
China Glaze Glitter Gradient: Midnight Mission, Cheers To You, Tinsel Town
Since I don't have a lot of time to do my nails lately, this is a design from a few weeks ago already. I guess I felt a bit Christmassy and I chose three of my favorites from China Glaze. As my base color I used Midnight Mission with two coats. Then I dabbed on a bit of Cheers To You and Tinsel Town on top with a sponge. Because matte glitter is awesome, I added Essie - Matte About You after my regular top coat. I love my Cheers To You memories, it's one of those bottles that made me fall in love with nail polish. (You need proof? My first blog post ever and there it is!) It's three years old but still as good as new. Cheers to China Glaze for that!
Sonntag, 8. Juni 2014
Water Spotted Neon Candy Nails
I felt like doing some really colorful nail art the other day and this is what I came up with. I picked a few lovely neon polishes and created random gradients with a sponge on each nail. For this first step I used Essie - Boom Boom Room, Bottle Servive, DJ Play That Song and China Glaze - Highlight Of My Summer. To complete the design I thought about doing a water spotted pattern on top using first Layla - Metal Chrome and then Wet n Wild - Black Crème. To see how I create the water spotted effect, check out my recent tutorial. I think it turned out really cute and I loved wearing this design! On top is one coat of Essence - BTGN High Gloss.
Sonntag, 1. Juni 2014
Bold Neon Stripes with China Glaze - Pool Party
I already posted these nails on my Instagram last week, because I felt like my phone captured the neon color better than my normal camera. I tried again later and I liked the result a bit better. Just imagine a very bright pink neon or if you own China Glaze - Pool Party, just imagine this one over white ;) I used striping tape as a guide for my lines because I wanted them to look perfect. There's one coat of Essence - BTGN High Gloss on top.
Sonntag, 25. Mai 2014
Purple & Mint Water Marble
Today's design is a water marble which I did last week and although I got a bit confused with what is left and right while doing the marbling, I still kind of liked it in the end. I used a white base to make sure that my colors would look opaque enough and then picked three colors for the marble: OPI - Pamplona Purple, Essie - First Timer and China Glaze - Holly-Day. Actually I just wanted to use mint and purple first, but then the lines weren't clear enough for me, so I had to add a darker color as well. On top is one coat of Essence - BTGN High Gloss.
Mittwoch, 7. Mai 2014
Waterspotted Nails - Tutorial for Nail It Magazine
I just wanted to share a tutorial that I created for Nail It magazine! It shows how I created the waterspotted nails from a few weeks ago for The Lacquer Legion challenge. I hope you like it! :)
You will need:
- China Glaze - Holly-Day
- Dance Legend - Wazowski
- cup of water
- disinfectant spray
- toothpick
- nail polish remover
- top coat
1. Paint your nails with your base color. I used two coats of China Glaze - Holly-Day. You can add tape around your nails to prevent a mess.
2. Add a drop of your multichrome polish into the cup of water.
3. Spray it with the disinfectant spray. You can vary the distance of the spray and the waiting time until dipping in your nail to create different effects!
4. Dip your nail into the water and remove the polish on the surface of the water with a toothpick.
5. This is what it looks like without using tape. Time for clean up!
6. Add top coat and you're done!
Sonntag, 4. Mai 2014
Movie Nail Art: The Grand Budapest Hotel
Today's nail art was inspired by a movie that I saw recently: The Grand Budapest Hotel by Wes Anderson. I loved the movie and there were so many inspiring colors and patterns that I decided to do some movie nail art. If you didn't see the movie (you should though!): Mendl's is a pastry shop and they pack their sweets in those adorable pink boxes with a blue ribbon. I used two coats of China Glaze - Something Sweet as my base color and Essie - Avenue Maintain for the ribbon. Since the writing on the boxes is really delicate I decided to paint it just on two nails with acrylic paint. On top is one coat of Essence - BTGN High Gloss.
Sonntag, 9. März 2014
Sponge Nail Art with China Glaze - Highlight of my Summer
I felt like doing some nail art with a sponge once again and chose some nice colors that would hopefully look good together. I used two coats of Sally Hansen - So-nata Problem as my base color. Then I sponged on some random spots with Sally Hansen - New Wave Blue of which I needed two coats as well. In a final step I added the star of this design: China Glaze - Highlight of my Summer. I love that color! On top is one coat of Essence - High Gloss.
Mittwoch, 5. März 2014
Neon Splash
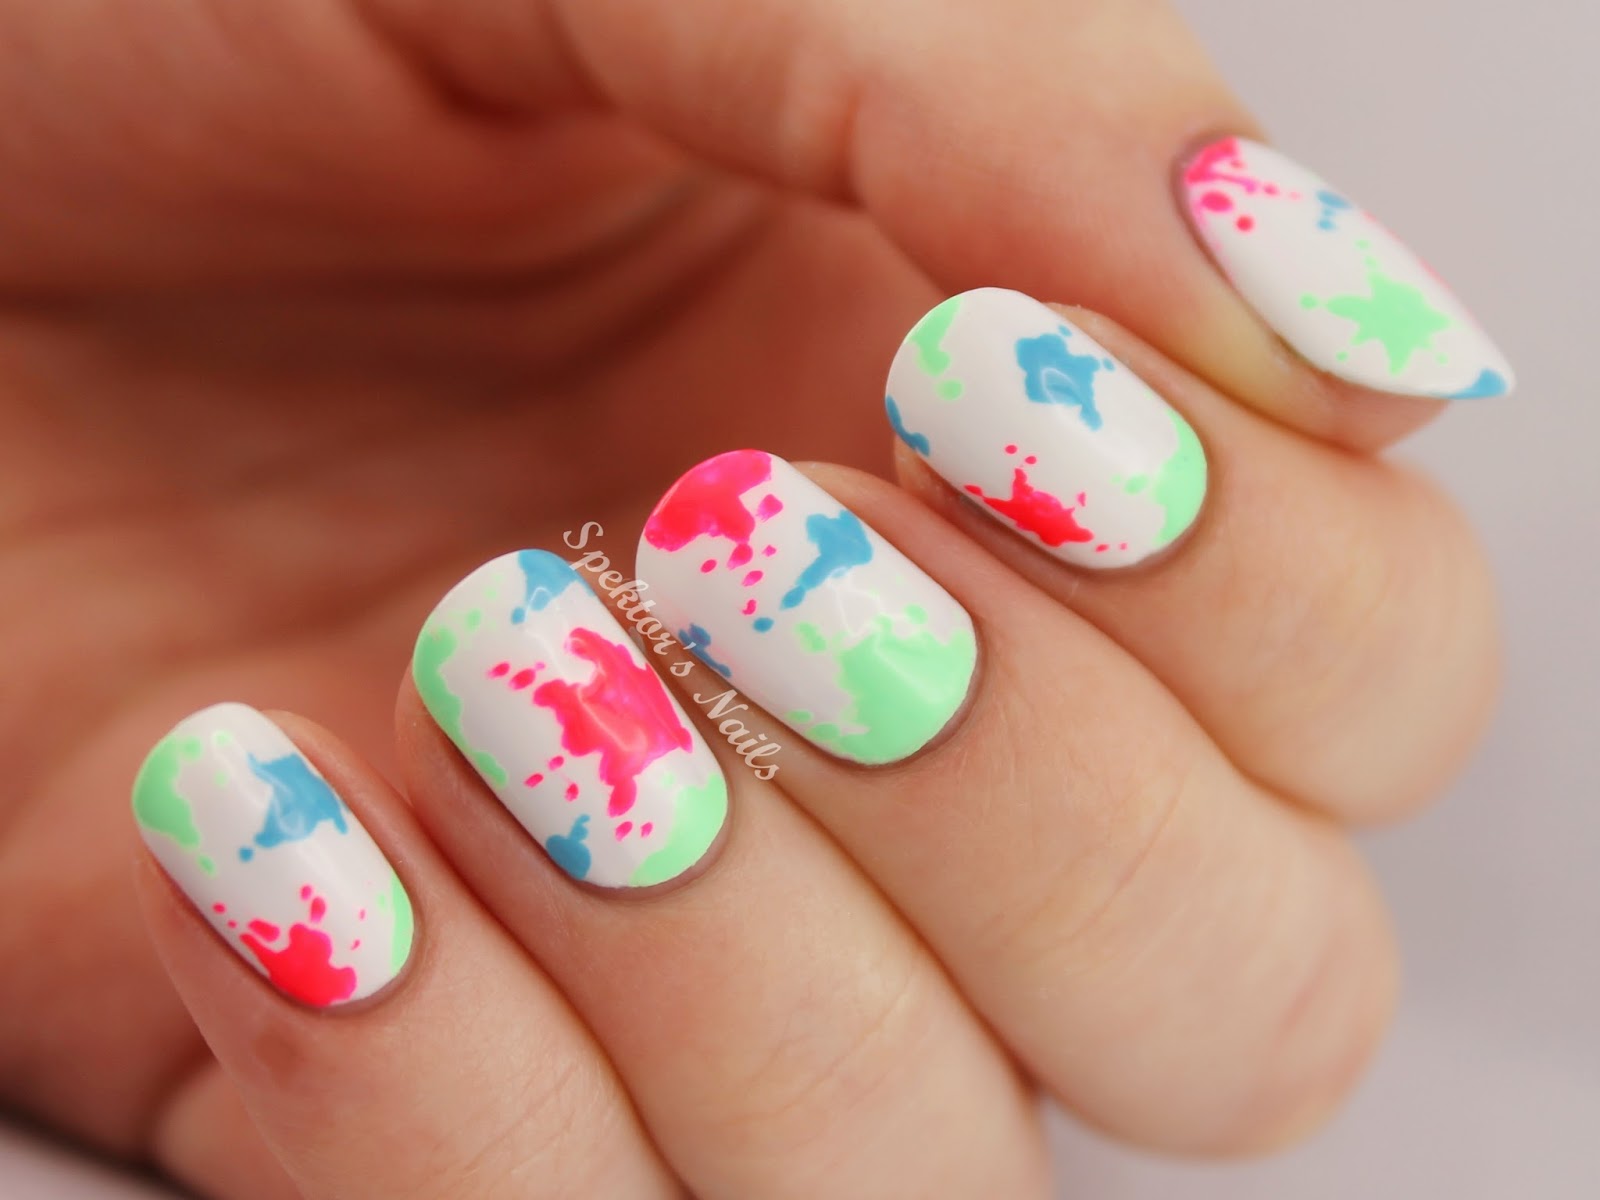
For today I have a simple design to show you, that I did a while ago. I used two coats of Flormar - 400 as my base and then painted on some random splashes and spots with China Glaze - Pool Party (Neon), China Glaze - Highlight Of My Summer (Neon) and H&M - U Must Have This. I did like the colors, but they do look a bit boring in the pictures. And I like the idea of splatter nails without the actual mess, so I might try this again with different colors.
Freitag, 28. Februar 2014
The Lacquer Legion Adoration: Waterspotted Chameleon
It's time for the second theme of The Lacquer Legion! This month's challenge was Adoration: something we adore, no matter if it is a person, a color, a design or a nail polish. The first thing that crossed my mind was the water spotted technique from cutepolish which she posted last year. I haven't done one of these in a while and I really love the effect! Obviously I had to combine the technique with a current favorite of mine: Dance Legend - Wazowski from the Chameleon collection. I used it over a base of China Glaze - Holly-Day and the two colors look great together! I'm sure these would also look fabulous in a water marble. I have added some additional pictures to show you the multichrome effect of Wazowski. You can find all of the other designs of this challenge with the hashtag #LLadoration. And you can find my January design here.
Mittwoch, 29. Januar 2014
OPI - Black Shatter & China Glaze - Pool Party
A crackling pool party, yay! I got a beautiful present from my boyfriend and I wanted to show you one of the polishes, although you probably already know this one. It's OPI - Black Shatter, a black crackling polish from their Shatter collection. I don't have a lot of crackling polishes and they are sometimes a bit difficult to combine, especially the glitter ones. But I do love the black one, especially over a clear bright neon pink like China Glaze - Pool Party. I used two coats of the base color and then one thick coat of the crackling polish which gives the best result in my opinion. On top is one coat of Essence - BTGN High Gloss.
Sonntag, 24. November 2013
Green Salted Watercolor Nails
Knowing that I wouldn't have time to do my nails this week (I'm wearing red nails for seven days now!) I prepared another version of my Salted Watercolor Nails. I figured this technique would look also pretty cool in green and with a gradient as a base. So I used Essie - Mint Candy Apple and Catrice - I'm Not A Greenager to create a gradient using a piece of sponge. Then I forgot to add the matte top coat which is supposed to keep the acrylic paint in place. That's why a lot of the green acrylic paint washed off with the water. The salt pattern was still visible though, so I decided to add a bit of China Glaze - Holly-Day on my tips and then finished the design with Essence - BTGN High Gloss Top Coat. I can't wait to try more color combinations once I have a bit more free time. Thank you for bearing with me! :)
Sonntag, 17. November 2013
Salted Watercolor Nails
Salted, what? Yes, I stumbled upon one of those art tutorials on YouTube the other day and we also learned that technique in school back then: the one where you sprinkle salt over watercolors and it results in beautiful textures. I figured if this works on paper it should work on nails (not that this is always the case, but I had to try), so I started with some colors and sea salt. As my base I used China Glaze - Re-Fresh Mint and then I added one coat of Essie - Matte About You to make a canvas for the acrylic paint. Then I mixed blue paint with water, painted it on the nail and sprinkled everything with salt. I still have to find the best way to do this technique, but for now I'm quite happy with my result. I also added a tiny bit of OPI - Pure 18K White Gold & Silver Top Coat and Sally Hansen - Night Watch. On top is one coat of Essence - BTGN High Gloss.
Sonntag, 29. September 2013
Breaking Bad Nails #2 - Tread Lightly
I'm sad and excited at the same time because Breaking Bad is coming to an end tonight/tomorrow! I just had to do another BB design for the finale and I decided to challenge myself this time. My right hand and the index finger nail plus thumb of my left hand are done with the same technique I used for my last BB design. Everything else is done with acrylic paint. My favorite nail is the teddy bear which took me about 30 minutes alone... I wasn't sure I would be able to paint it first, but now I'm really happy with the result. I'm also quite satisfied with Heisenberg. Now about Jesse Pinkman: I painted him today, because I was too tired to finish the design yesterday and you can actually see that in the color change. I'm also not too happy with his facial expression but after trying several times I had to give up on getting it right. All nails are finished with two coats of BTGN Top Sealer to protect the acrylic paint from peeling off. So to all BB fans, enjoy the finale!
Mittwoch, 11. September 2013
Breaking Bad Nails
Breaking Bad is now officially my most favorite show on TV. There are only three more episodes left until the series finale, so it was about time to bring back the Breaking Bad nails! I already painted Heisenberg on my nails in January, including a video tutorial for the Heisenberg decals and the liquid sand glitter meth. Since my latest Watercolor Nails reminded me of the poisonous green smoke in the series intro, I decided to paint it on my nails this time. While experimenting with colors and plastic bags, Sarah from Chalkboard Nails created her awesome Midnight Smoke design for the 31 Days Challenge and I fell in love! I decided that this technique would look more realistic so I used Flormar - N006 & Essie - The More The Merrier to create a smoke effect on top of China Glaze - Holly-Day. I messed up my prepared decals with the chemical symbols, that's why I had to free-hand them with white nail polish. On top is one coat of Essence BTGN Top Sealer. And obviously my badass Heisenberg shirt had to be in the pictures as well.
| (The RV ♥) |
Freitag, 19. Juli 2013
Cut Out & Outlined Nails with Neon Mint & Neon Glitter
I really like the idea of cut out nail art, the technique which just leaves a small part of the bare nail visible. Of course it looks best if the natural nail is not stained at all, but my nails are usually a bit stained. So to prepare for this look I buffed my nails and used a whitening base coat (Essie - Beam Up). Once again I made China Glaze - Highlight Of My Summer the star of this design, but there's also another favorite involved: Lush Lacquer - Clowning Around. Although I prefere Clowning Around on a white base, I think it does look interesting on mint as well. My white color is Flormar - M103. For the triangle I found an awesome video tutorial by kirakiranail on Youtube. Maybe I'm just a bit dense, but I never figured out how cut out triangles actually work. I always thought they just free-hand the triangle, fill in the rest and then do a lot of clean up. But actually you can use a piece of tape and just leave a small strip on one side of the triangle to grab it later. Then all you have to do is complete the triangle with a nail art brush. You can see the process in her tutorial. What do you think about cut out nail art? Would you wear it?
Abonnieren
Posts (Atom)